
Background
Back in my previous company, we cared a lot about automation testing. We always pushed to write more tests and write them effectively.
But there is 1 problem. It’s the time it takes to run all the tests.
As the project grows, more and more tests are added.
As the team grows, more and more times the team and the CI need to run the tests. Especially on CI, we normally clean and re-run all the tests, regardless of the changes.
It makes the time to run all the tests increase dramatically 😭
With over 3000 unit tests back then, it took us around ~ 7 mins to run all the tests. We had 20 iOS engineers, and each of us triggered an average of 3 times CI running per day. To summarize all of that, we spent 420 mins to run tests per day.
Imagine you made a small change, ex. update the README file of the app, but you still need to wait for the CI to finish running before you can merge the change. That’s soooooo annoying 😤
I wonder how I can improve the testing time. Recently I have been developing a solution to reduce the test execution time on our project. That is selective testing.
What is Selective Testing?
As mentioned above, we always re-run all the tests regardless of the changes.
Selective testing is about only running the tests of the modules that are affected by the change, reducing the time to run the tests significantly. 🚀
So what is an affected module?
A module is affected by the changed if it’s source code or it’s dependencies has changed.
For example, we have this dependencies graph

- If FeatureA source code changed -> Only FeatureA is marked as changed -> Only need to run test for FeatureATests.
- If FeatureB source code changed -> Only FeatureB is marked as changed -> Only need to run test for FeatureBTests.
- If the Core source code changed -> FeatureA, FeatureB, and Core are marked as changed -> Need to test FeatureATests, FeatureBTests, and CoreTests.
How?
How did I implement selective testing?
My simple idea is:
- Collect all the modules in the project, and generate a dependencies graph for all modules.
- Generate a hash for each module.
- Compare that generated hash in step 2 with the module’s hash in cache. If 2 hash are different, that means the module has been changed since the latest test run, and needs to be re-run.
- From step 3, we got all the affected modules. In this step, update the test plan to skip all the unaffected modules, and only run the test for affected modules.
- After running the test successfully, store the new hashes in the cache.
Here is the overview diagram of the flow:
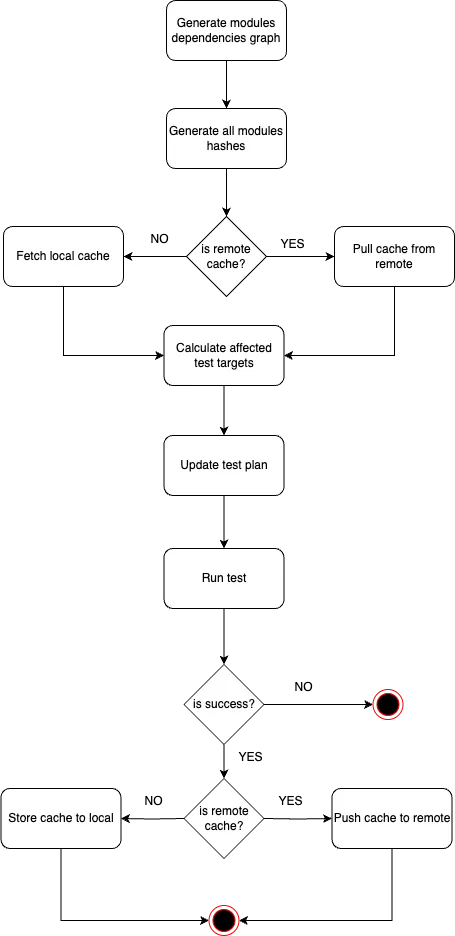
1. Generate module dependencies
First, we need to generate a dependencies graph of all modules in our project.
I achieved that by using the command dump-package and processing the Package.resolved file to gather all the information on both local modules and remote dependencies.
Here is an example of how the dependencies graph looks like:
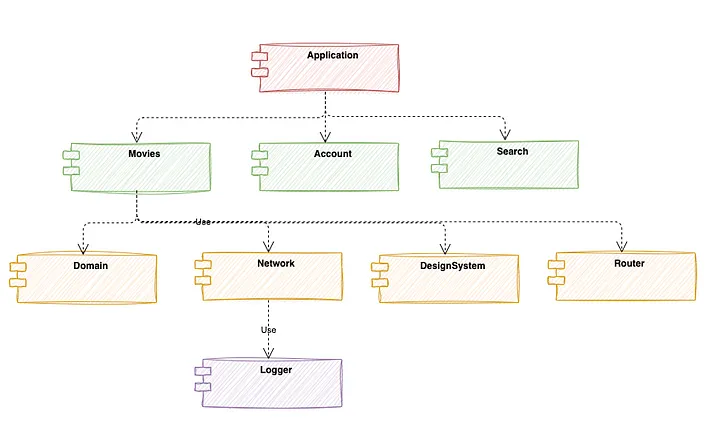
2. Generate module hash
In this step, we will hash every module to generate module hashes. This module hash will be used to determine if a module is affected module or not (more detail in step 4).
“Why need hashing? Why don’t we use git diff to detect changed files? Using git diff will be much faster than hashing” — You might ask.
I use having because I want to support sharing the cache on remote/CI. Using git diff can only work locally. (In the future, I will update to use git diff for the local cache and use hashing for the remote cache)
The module hash is calculated by combining:
- The hash of the module’s source code
- Module name
- The hash of the module’s dependencies
- Module’s version
- …
// Example modules hashes"Search": "938c2cc0dcc05f2b68c4287040cfcf71","SearchTests" : "bf37002800afee8f7f88f7a55dee7687","People": "a324af744770415af3f19a1c8c9afd2e","PeopleTests" : "30fee4dced287028d2f9121e2ab292ba","Network" : "a324af744770415af3f19a1c8c9afd2e",...3. Fetching cache
The cache is a storage that stores all the module’s hashes from the latest successful test run.
My solution supports both local cache and remote cache. Engineers can use local cache in daily development workflow, while remote cache is used to share the cache between multiple CI runners.
The cache is simply a JSON file that stores all the hashes of the test modules in the test plan.
For the remote cache, I create a new repository to store the cache. Here is an example of a remote cache repo.
And even better, each branch will have its cache. It will allow our team to share branches, and share cache between CI runners more effectively.
In this step, we will fetch all the modules’s hashes from the cache.
4. Update the test plan
We have both the latest hashes of the modules (from the cache) and the current hashes of the modules after we made some changes.
Now how can we get the affected modules?
The work here is quite simple, we need to compare the module hash before and after the change. If they are different, that means the module is affected by the change and needs to re-run the test of that module.
After we got all the affected modules, we updated the test plan to run those affected modules only, skipping all the unaffected modules.
5. Update cache
Finally, we ran the test with the updated test plan.
If the test runs successfully, we store the new cache in the local cache/remote cache.
Result
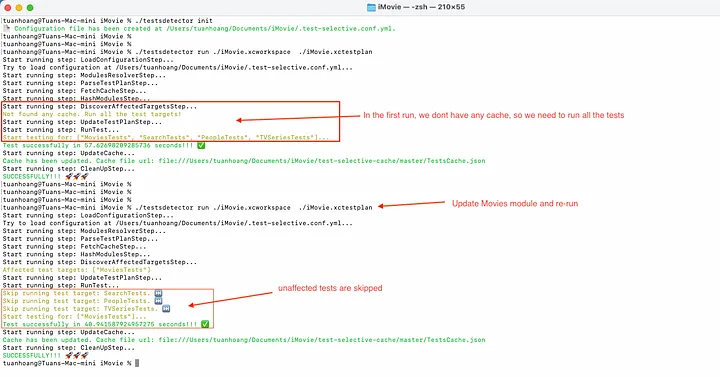
In my example project, I have 4 independent feature modules. I only changed the Movie module, and then re-run the test using the selective-testing tool.
Based on the image above, you can see that tests of unaffected modules are skipped, and the tool only re-run the test for the Movie module 🚀
Conclusion
This solution can reduce the test execution time effectively, and I believe it’s worth a chance to integrate it into your project.
You can find the source code here.
This project is still in the development phase, and I’m working hard to make it ready for production.
If you feel interested in this solution, don’t hesitate to contribute to the project ^^
Special thanks to these great open-source projects that inspired part of my solution 🫶