
When I was working at GxS, one thing that we truly cared about was the code quality. To ensure the code quality, we added a rule that code coverage needs to be at least 85%.
So far so good, we got over 3000 unit tests after 2 years, and everyone was happy when looking at the code coverage. But is the code coverage metric enough to ensure the quality of the codebase?
The problem
Later when I had a chance to take a closer look at the unit tests of the project, I realized that we have some problems with how we’re writing tests. Some problems related to code coverage are:
- Some unit tests don’t bring any benefits to protecting the codebase. They’re just there to raise the code coverage.
// Example Codefunc calculateSomething(input: Input) -> Int {  // Complex logic  return result}
// Test// This test doesn't add any protection to the codebase// but still increase the code coveragefunc testCalculateSomething() { let result = viewModel.calculateSomething(input) XCTAssertNotNil(result)}- Even if the test does not cover all the logic inside the function, the code coverage still shows 100%:
//Example Codeclass ViewModel {    var cache: Int    func calculateSomething(input: Input) -> Int {      // Complex logic      cache = result      return result    }}
// Test// This test misses the checking for the `cache` value// but still shows the 100% code coveragefunc testCalculateSomething() { let result = viewModel.calculateSomething(input) XCTAssertNotNil(result)}- During code review, we often ignore reviewing the unit tests. (Sorry boss 😛)
I conducted a sharing session to raise all the problems & proposed solutions with the team. However, for the code coverage problems above, the only solution I could think of back then was that everyone needed to put extra effort into writing effective unit tests.
Human makes mistakes, yes. We need to find an automated solution to help us handle these problems.
Recently I’ve discovered a testing technique that I never heard of before — Mutation testing technique, which can help engineers develop quality tests.
In this article, I will introduce this testing technique. And even better, a Swift open source that we can easily integrate into our project to apply mutation testing 🤩
Mutation testing
What is mutation testing?
Mutation testing (or mutation analysis) is used to design new software tests and evaluate the quality of existing software tests by identify weakly tested pieces of code (code that is not coveered by test) and identiy weak tests (tests that don’t bring any benefit)
How does it work?
- Make changes to your source code based on well-defined mutation operators (More on this later). Each change will be called a mutant.
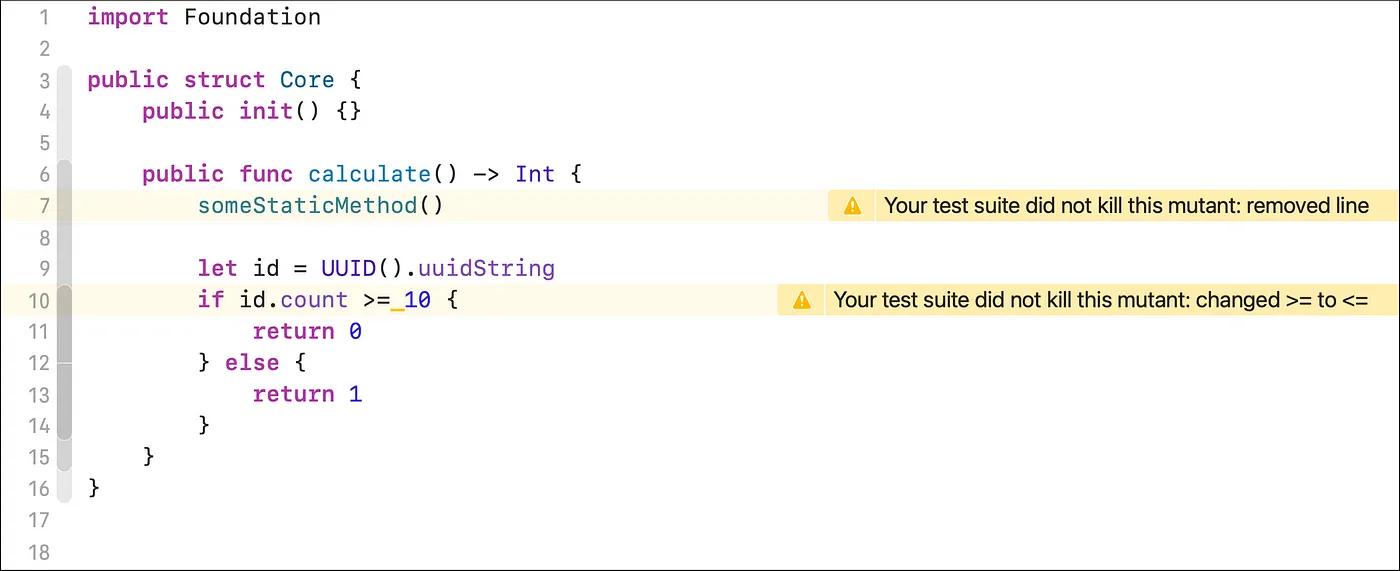
- Run the whole test suite for each mutant. This process is called killing mutants. If the tests failed, it means the tests detected the mutant and can be considered good tests (the mutant has been killed). Otherwise, if the tests still succeed, it means the mutant is still alive, and your tests are not good enough to detect the change.
- After evaluating all the mutants, calculate the mutation score: mutation score = (number of killed mutants/number of mutants) * 100 The mutation score represents the quality of the test suite. The higher it is, the better your test suite is.

Mutation Operators
Making changes to the source code doesn’t mean making random changes. Instead, all the changes are based on mutation operators.
A mutation operator serves as a guideline that substitutes portions of the source code
Some common mutation operators are:
- Replacement of some boolean relations with others, e.g. > with <, ≥ with <=, == with !=, …
- Replacement of boolean subexpressions with true and false
- Remove method body
- …
// Example 1// Original codefunc isGreater(n1: Int, n2: Int) -> Bool {    return n1 > n2}
// After apply mutation operator that replace > with <, now the code become:func isGreater(n1: Int, n2: Int) -> Bool {    return n1 < n2}
================// Example 2// Original codeif myValue == 50 {    // something happens here}
// After apply mutation: change == to !=if myValue != 50 {    // something happens here}================// Example 3// Original codefunc calculate() -> Int {    ... some side effect ...    return 5}
// After apply mutation: remove side effectfunc calculate() -> Int {    return 5}
Open-source project: Muter
Muter is an iOS open-source that helps you to apply the mutation testing technique to your project.
How does it work?
Muter follows the same concept of mutation testing. For those who are curious how they implemented using Swift, I got your back 😌:
-
Muter iterates through swift files in your project then uses SwiftSyntax & mutation operators to create a list of mutants. Please note that at this point we haven’t applied this mutant to the original codebase yet.
-
For each mutation, apply that mutation to the origin source code by using SwiftSyntax. After that, run the test suite by using xcodebuild test, then read the generated test log to determine if the test suite succeeds or fails.
-
Calculate mutation score
-
Generate the report.
Besides, Muter applies some advanced techniques like Mutation schemata, Xcode test-without-building, … to improve the performance of the process.
Muter’s strengths
- Flexibility: Muter is flexible by allowing customized Muter configuration.
- Comprehensive Documentation: Muter has a good document and a well-structured codebase.
- Versatile Installation: Muter supports diverse installation: via CI/CD, runs directly in Xcode projects, …
- Safe Mutation: Muter applies all the mutants in a copy of your source code, ensuring zero impact on your primary codebase.
Consideration
Some of my considerations when playing around with Muter on my sample project are:
- It still has some small bugs. However, we can still bypass these bugs by custom Muter configuration.
- The process might take time to finish due to it need to run the whole test suite again and again. If your project has a thousand unit tests, you need to measure it carefully before integrating it into your development workflow.
Proposed ideas
Since it could take time to perform mutation testing, we should try to avoid running this process often. My suggestions are:
- Run Muter for only files changed to reduce the number of mutations that can be created.
- Create a job on CI/CD that runs mutation testing at night/weekend, so that it will not affect developer productivity.
Reference
Conclusion
While code coverage serves as a valuable metric, it fails to encapsulate the test quality accurately. The limitations of code coverage become evident in its inability to gauge test quality effectively.
However, embracing mutation testing can substantially enhance the quality of unit tests. By uncovering potential weaknesses and offering insights into corner cases, mutation testing stands as an effective technique in fortifying test suites and elevating overall code quality.
If you know of any better solutions or have any thoughts, don’t hesitate to leave a comment, I love to hear that.